1. 引言
Redis作为一个内存数据库其读写速度非常快,并且支持原子操作,这使得它非常适合处理频繁的请求,一般情况下,我们会使用Redis作为缓存数据库,但处理做缓存数据库之外,Redis的应用还十分广泛,比如这一节,我们将讲解Redis在限流方面的应用。
2. 通过setnx实现限流
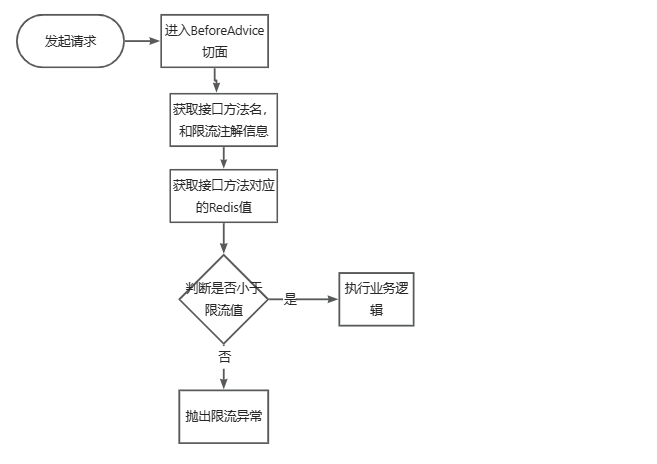
我们通过切面,来获取某给接口在一段时间内的请求次数,当请求次数超过某个值时,抛出限流异常,直接返回,不执行业务逻辑。思路大致如下:
2.1. 初步实现
我们参照上面的流程,对Redis限流进行实现。首先引入aop切面相关的依赖
1
2
3
4
| <dependency>
<groupId>org.springframework.boot</groupId>
<artifactId>spring-boot-starter-aop</artifactId>
</dependency>
|
然后添加一个限流注解类,这个注解有三个属性,maxTimes表示最大访问次数,interval表示限流间隙,unit表示时间的单位,假设配置的值为maxTimes=10, interval=1, unit= TimeUnit.SECONDS,那么表示在1秒内,限制访问次数为10次。
1
2
3
4
5
6
7
8
9
10
11
12
13
14
15
16
17
18
19
20
| package org.example.annotations;
import java.lang.annotation.ElementType;
import java.lang.annotation.Retention;
import java.lang.annotation.RetentionPolicy;
import java.lang.annotation.Target;
import java.util.concurrent.TimeUnit;
@Target(value = ElementType.METHOD)
@Retention(RetentionPolicy.RUNTIME)
public @interface Limit {
public int maxTimes() default 1;
public int interval() default 1;
public TimeUnit unit() default TimeUnit.SECONDS;
}
|
返回结果类:
1
2
3
4
5
6
7
8
9
10
11
12
13
14
15
16
17
18
19
20
21
22
23
24
25
26
27
28
29
30
31
32
33
34
35
36
37
38
39
40
41
42
43
44
45
46
47
48
49
50
51
52
53
54
55
56
57
58
59
60
61
62
| package org.example.common;
import lombok.Getter;
import java.io.Serializable;
public class Response <T> implements Serializable {
@Getter
private int code;
@Getter
private String msg;
@Getter
private T data;
private Response(int code, String msg) {
this.code = code;
this.msg = msg;
}
private Response(int code, String msg, T data) {
this.code = code;
this.msg = msg;
this.data = data;
}
private Response(ResultCode resultCode) {
this.code = resultCode.getCode();
this.msg = resultCode.getMsg();
}
private Response(ResultCode resultCode, T data) {
this.code = resultCode.getCode();
this.msg = resultCode.getMsg();
this.data = data;
}
public static <T> Response success() {
return new Response(ResultCode.SUCCESS);
}
public static <T> Response success(T data) {
return new Response(ResultCode.SUCCESS, data);
}
public static <T> Response fail() {
return new Response(ResultCode.FAIL);
}
public static <T> Response fail(ResultCode resultCode) {
return new Response(resultCode);
}
public static <T> Response error() {
return new Response(ResultCode.SERVER_ERROR);
}
public static <T> Response error(String msg) {
return new Response(ResultCode.SERVER_ERROR.getCode(), msg);
}
}
|
错误码类,在错误码中,我们添加一个LIMIT_ERROR,表示该接口被限流。
1
2
3
4
5
6
7
8
9
10
11
12
13
14
15
16
17
18
19
20
21
22
23
24
25
26
27
28
| package org.example.common;
public enum ResultCode {
SUCCESS(200, "操作成功"),
FAIL(400, "操作失败"),
SERVER_ERROR(500, "服务器错误"),
LIMIT_ERROR(400, "限流");
int code;
String msg;
ResultCode(int code, String msg) {
this.code = code;
this.msg = msg;
}
public int getCode() {
return this.code;
}
public String getMsg() {
return this.msg;
}
}
|
业务异常类
1
2
3
4
5
6
7
8
9
10
11
12
| public class BusinessException extends RuntimeException {
private ResultCode resultCode;
public BusinessException(ResultCode resultCode) {
super(resultCode.getMsg());
this.resultCode = resultCode;
}
public ResultCode getResultCode() {
return this.resultCode;
}
}
|
全局异常处理类,在我们的切面中,如果发现访问次数大于最大访问次数,那么抛出限流异常,由全局异常处理类进行处理,返回对应的结果
1
2
3
4
5
6
7
8
9
10
11
12
13
14
15
16
17
18
| package org.example.exception;
import org.example.common.Response;
import org.springframework.web.bind.annotation.ExceptionHandler;
import org.springframework.web.bind.annotation.RestControllerAdvice;
@RestControllerAdvice
public class GlobalExceptionHandler {
@ExceptionHandler(value = BusinessException.class)
public Response handleBusinessException(BusinessException e) {
return Response.fail(e.getResultCode());
}
@ExceptionHandler(value = Exception.class)
public Response handleException(Exception e) {
return Response.error(e.getMessage());
}
}
|
限流切面类
1
2
3
4
5
6
7
8
9
10
11
12
13
14
15
16
17
18
19
20
21
22
23
24
25
26
27
28
29
30
31
32
33
34
35
36
37
38
39
40
41
42
43
44
45
46
47
48
49
50
51
52
53
54
55
56
57
58
59
60
61
| package org.example.aspect;
import org.aspectj.lang.JoinPoint;
import org.aspectj.lang.annotation.Aspect;
import org.aspectj.lang.annotation.Before;
import org.aspectj.lang.annotation.Pointcut;
import org.aspectj.lang.reflect.MethodSignature;
import org.example.annotations.Limit;
import org.example.common.ResultCode;
import org.example.exception.BusinessException;
import org.example.util.RedisUtils;
import org.springframework.beans.factory.annotation.Autowired;
import org.springframework.stereotype.Component;
@Component
@Aspect
public class LimitAspect {
@Autowired
private RedisUtils redisUtils;
@Pointcut("@annotation(org.example.annotations.Limit)")
public void pointCut() {
}
@Before("pointCut()")
public void beforeAdvice(JoinPoint joinPoint) {
String methodName = joinPoint.getSignature().getName();
String prefixMethod = joinPoint.getSignature().getDeclaringTypeName();
String fullMethodName = prefixMethod + "." + methodName;
System.out.println("methodName:" + fullMethodName);
Object[] args = joinPoint.getArgs();
for (Object arg : args) {
System.out.println("method argument:" + arg);
}
MethodSignature methodSignature = (MethodSignature) joinPoint.getSignature();
Limit annotation = methodSignature.getMethod().getAnnotation(Limit.class);
System.out.println(annotation.unit());
System.out.println(annotation.maxTimes());
System.out.println(annotation.interval());
Object key = redisUtils.getKey(fullMethodName);
if (key != null) {
Integer redisValue = (Integer) key;
if (redisValue.compareTo(annotation.maxTimes()) < 0) {
redisUtils.increment(fullMethodName);
return;
}
throw new BusinessException(ResultCode.LIMIT_ERROR);
}
redisUtils.addKey(fullMethodName, 1, annotation.interval(), annotation.unit());
}
}
|
最后添加一个TestController类,用于进行接口的测试:
1
2
3
4
5
6
7
8
9
10
11
12
13
14
15
16
17
18
19
20
21
22
23
| package org.example.controller;
import org.example.annotations.Limit;
import org.example.common.Response;
import org.example.common.ResultCode;
import org.example.exception.BusinessException;
import org.springframework.web.bind.annotation.GetMapping;
import org.springframework.web.bind.annotation.RequestMapping;
import org.springframework.web.bind.annotation.RequestParam;
import org.springframework.web.bind.annotation.RestController;
import java.util.concurrent.TimeUnit;
@RestController
@RequestMapping(value = "/test")
public class TestController {
@GetMapping(value = "/hello1")
@Limit(maxTimes = 10, interval = 100, unit = TimeUnit.SECONDS)
public Response hello1(@RequestParam(name = "name", defaultValue = "cxy") String name) {
return Response.success("hello1 success " + name);
}
}
|
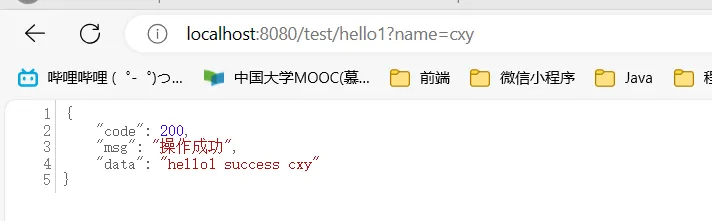
从上面的接口注解配置中,可以看出,这个接口在100秒内最多访问10次,我们启动项目,访问/test/hello1,前10次的访问结果为:
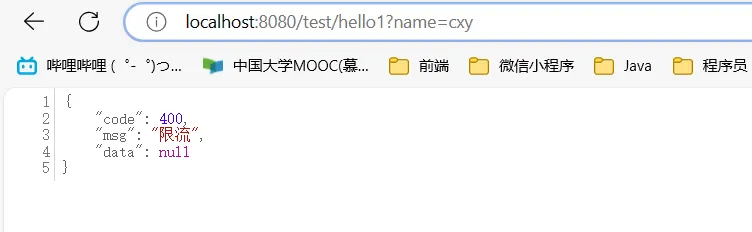
第11次时,开始限流了
这里看起来不是很直观,我们将时间间隙改为2,表示2秒最多由10个请求能执行
1
2
3
4
5
| @GetMapping(value = "/hello1")
@Limit(maxTimes = 10, interval = 2, unit = TimeUnit.SECONDS)
public Response hello1(@RequestParam(name = "name", defaultValue = "cxy") String name) {
return Response.success("hello1 success " + name);
}
|
使用postman进行并发请求,下面的redis限流测试,就是刚才提到的http://localhost:8080/test/hello1?name=cxy这个请求
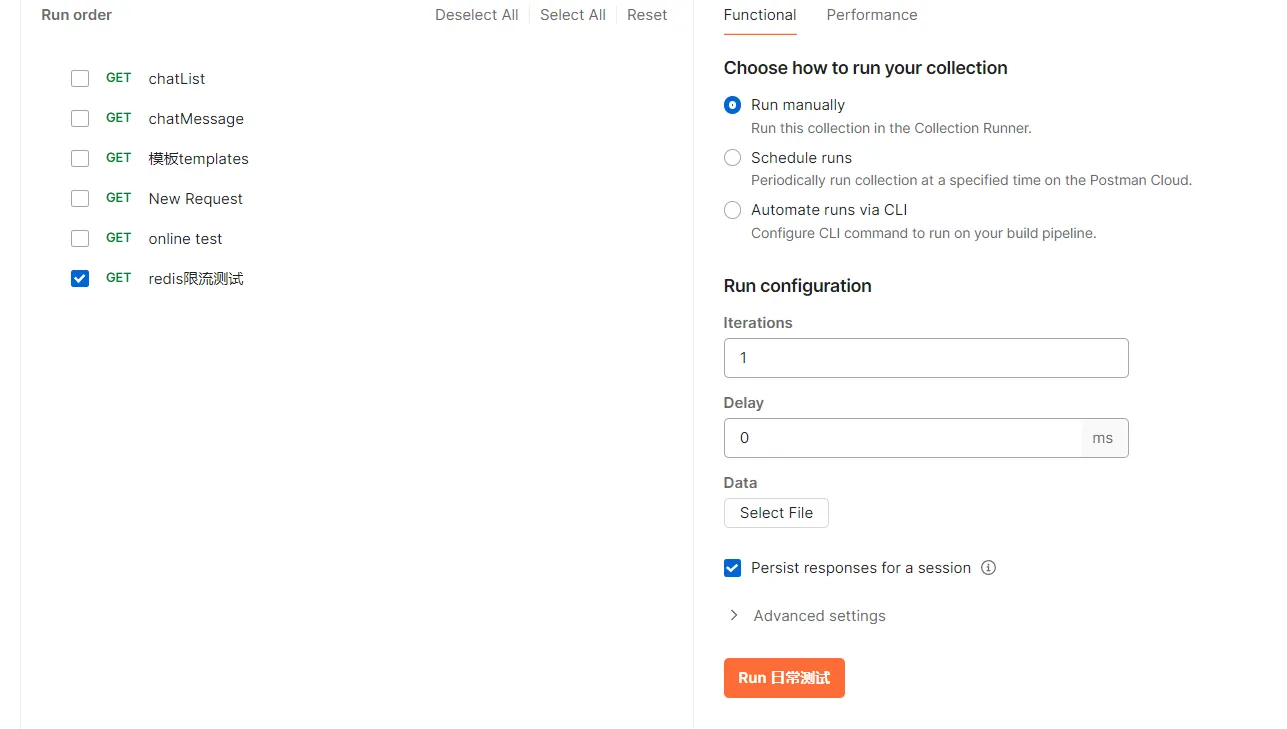
执行该并发测试,结果如下:
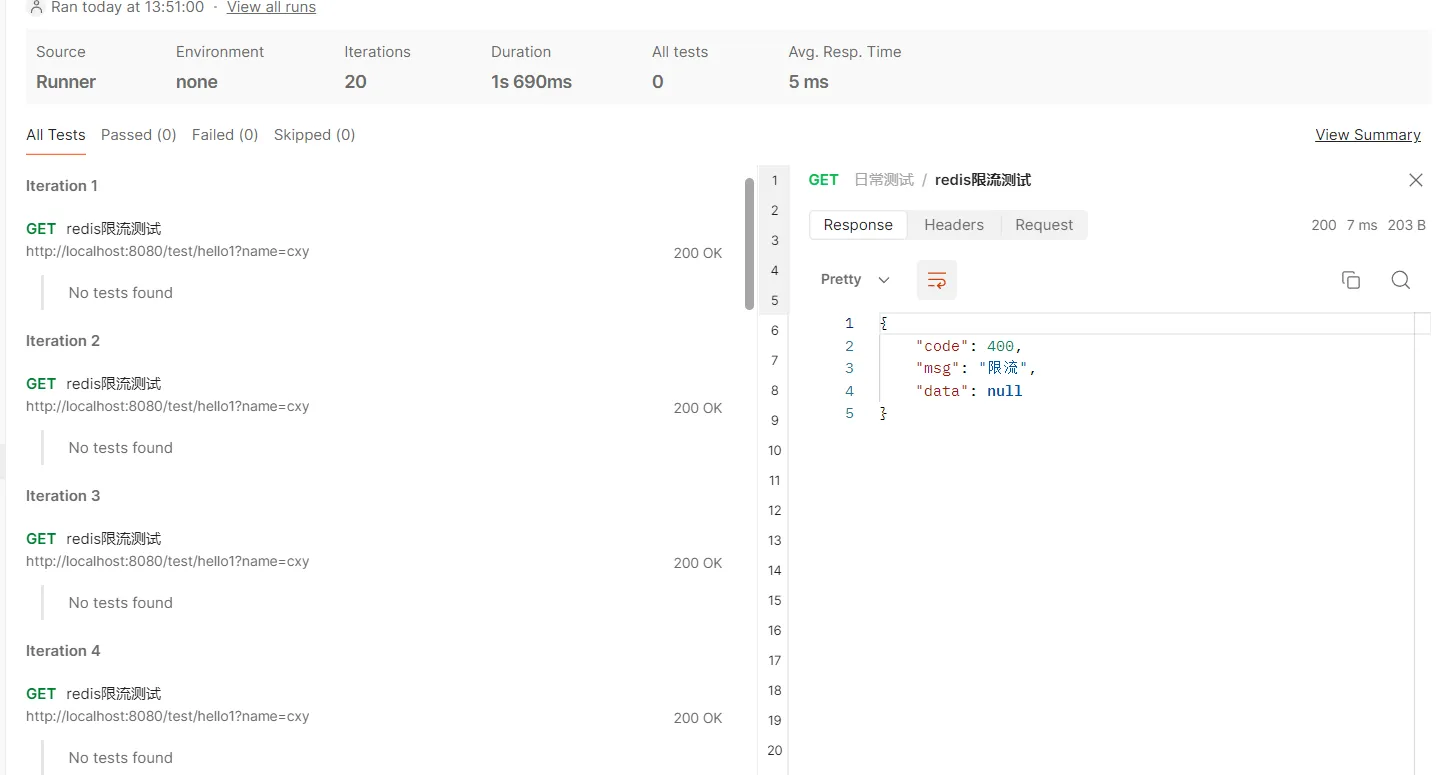
这里20个请求中,有10个成功,10个被限流。不过这个postman结果展示不太好,只能一个一个查看结果,这里就不一一展示了。
2.2. 职责分离
上面的代码,虽然能成功限流,但是有一个问题,就是切面类的beforeAdvice方法中,做的事情太多了,又是解析请求参数、解析注解参数,又是使用查询Redis,进行限流判断,我们应该将限流逻辑的判断,此外,这里使用的是Redis,如果后续我们不使用Redis,换成其他方式进行限流判断的话,需要改很多处代码,因此,这里要做一些优化,包括:
1)定义限流请求类,用于封装访问的方法名、注解信息等内容
2)定义限流处理接口
3)定义Redis限流处理类,通过Redis实现限流处理接口
我们首先定义一个限流请求类,封装限流处理所需要的参数:
1
2
3
4
5
6
7
8
9
10
11
12
13
14
15
16
17
18
19
20
21
| package org.example.request;
import lombok.Data;
import java.io.Serializable;
import java.util.HashMap;
import java.util.Map;
import java.util.concurrent.TimeUnit;
@Data
public class LimitRequest implements Serializable {
private String methodName;
private Integer interval;
private Integer maxTimes;
private TimeUnit timeUnit;
private Map<String, Object> extendMap = new HashMap<>();
}
|
定义限流处理接口
1
2
3
4
5
6
7
| package org.example.limit;
import org.example.request.limit.LimitRequest;
public interface LimitHandler {
void handleLimit(LimitRequest limitRequest);
}
|
定义Redis的限流处理类
1
2
3
4
5
6
7
8
9
10
11
12
13
14
15
16
17
18
19
20
21
22
23
24
25
26
27
28
29
30
31
32
33
34
| package org.example.limit;
import org.example.common.ResultCode;
import org.example.exception.BusinessException;
import org.example.request.limit.LimitRequest;
import org.example.util.RedisUtils;
import org.springframework.beans.factory.annotation.Autowired;
import org.springframework.stereotype.Component;
@Component
public class RedisLimitHandler implements LimitHandler{
@Autowired
private RedisUtils redisUtils;
@Override
public void handleLimit(LimitRequest limitRequest) {
String methodName = limitRequest.getMethodName();
Object key = redisUtils.getKey(methodName);
if (key != null) {
Integer redisValue = (Integer) key;
if (redisValue.compareTo(limitRequest.getMaxTimes()) <= 0) {
redisUtils.increment(methodName);
return;
}
throw new BusinessException(ResultCode.LIMIT_ERROR);
}
redisUtils.addKey(methodName, 1, limitRequest.getInterval(), limitRequest.getTimeUnit());
}
}
|
修改LimitAspect代码,但后续更换限流策略是,只需要修改LimitHandler的bean即可。
1
2
3
4
5
6
7
8
9
10
11
12
13
14
15
16
17
18
19
20
21
22
23
24
25
26
27
28
29
30
31
32
33
34
35
36
37
38
39
40
41
42
43
44
45
46
47
48
49
50
| package org.example.aspect;
import org.aspectj.lang.JoinPoint;
import org.aspectj.lang.annotation.Aspect;
import org.aspectj.lang.annotation.Before;
import org.aspectj.lang.annotation.Pointcut;
import org.aspectj.lang.reflect.MethodSignature;
import org.example.annotations.Limit;
import org.example.limit.LimitHandler;
import org.example.request.limit.LimitRequest;
import org.springframework.stereotype.Component;
import javax.annotation.Resource;
@Component
@Aspect
public class LimitAspect {
@Resource
private LimitHandler redisLimitHandler;
@Pointcut("@annotation(org.example.annotations.Limit)")
public void pointCut() {
}
@Before("pointCut()")
public void beforeAdvice(JoinPoint joinPoint) {
LimitRequest limitRequest = convert2LimitRequest(joinPoint);
redisLimitHandler.handleLimit(limitRequest);
}
private LimitRequest convert2LimitRequest(JoinPoint joinPoint) {
LimitRequest limitRequest = new LimitRequest();
String methodName = joinPoint.getSignature().getName();
String prefixMethod = joinPoint.getSignature().getDeclaringTypeName();
limitRequest.setMethodName(prefixMethod + "." + methodName);
Object[] args = joinPoint.getArgs();
limitRequest.getExtendMap().put("args", args);
MethodSignature methodSignature = (MethodSignature) joinPoint.getSignature();
Limit annotation = methodSignature.getMethod().getAnnotation(Limit.class);
limitRequest.setInterval(annotation.interval());
limitRequest.setMaxTimes(annotation.maxTimes());
limitRequest.setTimeUnit(annotation.unit());
return limitRequest;
}
}
|
3. 通过Zset实现限流
我们可以将请求打造成一个zset数组,每一次请求进来时,value保持一致,可以用UUID生成,然后score用当前时间戳表示,通过range方法,来获取某个时间范围内,请求的个数,然后根据这个个数与限流值对比,当大于限流值时,进行限流操作。
我们修改RedisLimitHandler代码如下:
1
2
3
4
5
6
7
8
9
10
11
12
13
14
15
16
17
18
19
| @Override
public void handleLimit(LimitRequest limitRequest) {
handleLimitByZSet(limitRequest);
}
private void handleLimitByZSet(LimitRequest limitRequest) {
String methodName = limitRequest.getMethodName();
long currentTime = System.currentTimeMillis();
long interval = TimeUnit.MILLISECONDS.convert(limitRequest.getInterval(), limitRequest.getTimeUnit());
if (redisUtils.hasKey(methodName)) {
int count = redisUtils.rangeByScore(methodName, Double.valueOf(currentTime - interval), Double.valueOf(currentTime)).size();
if (count > limitRequest.getMaxTimes()) {
throw new BusinessException(ResultCode.LIMIT_ERROR);
}
}
redisUtils.addZSet(methodName, UUID.randomUUID().toString(), Double.valueOf(currentTime));
}
|
然后添加一个测试类,用于模拟并发场景下的多个请求
1
2
3
4
5
6
7
8
9
10
11
12
13
14
15
16
17
18
19
20
21
22
23
24
25
26
27
28
29
30
31
32
33
34
35
36
37
38
39
40
41
42
43
| package org.example;
import com.alibaba.fastjson.JSONObject;
import org.example.common.Response;
import org.example.common.ResultCode;
import org.example.controller.TestController;
import org.example.exception.BusinessException;
import org.junit.jupiter.api.Test;
import org.springframework.beans.factory.annotation.Autowired;
import org.springframework.boot.test.context.SpringBootTest;
import java.util.ArrayList;
import java.util.List;
import java.util.concurrent.*;
@SpringBootTest
public class RedisLimitTest {
@Autowired
private TestController testController;
@Test
public void testLimit() throws ExecutionException, InterruptedException {
ExecutorService executorService = Executors.newFixedThreadPool(5);
Callable<Response> callable = () -> {
try {
String name = "cxy";
return testController.hello1(name);
} catch (BusinessException e) {
return Response.fail(e.getResultCode());
}
};
List<Future<Response>> futureList = new ArrayList<>();
for (int i = 0; i < 20; i++) {
Future<Response> submit = executorService.submit(callable);
futureList.add(submit);
}
for (Future<Response> future : futureList) {
System.out.println(JSONObject.toJSONString(future.get()));
}
}
}
|
运行结果如下:
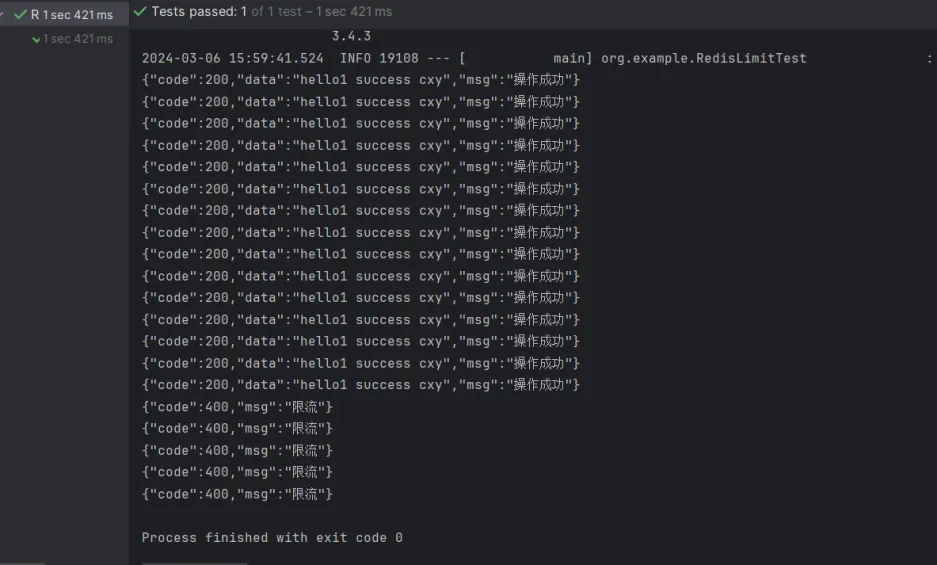
我们可以看到,这里确实进行限流了,但是,这个限流个数不太对,这是因为可能多个请求都执行到这条代码,获取到同一个值,然后才进行更新。
int count = redisUtils.rangeByScore(methodName, Double.valueOf(currentTime - interval), Double.valueOf(currentTime)).size();
比如有5个请求同时打过来,此时的执行到上面这条代码时,redis中符合范围的刚好有9条,那么这5个请求在进行判断时,都小于限流值,因此都会执行,然后才是更新zset,这个就是并发场景下的问题了。
另外,使用zset还有一个问题,它虽然能达到滑动窗口的效果,但是zset的数据结构会越来越大。