1. 简介 Spring Security是一个用于包含应用程序安全性的Java框架,它提供了一套全面的安全解决方案,包括身份验证、授权、防止攻击等功能。它基于过滤器链的概念,可以轻松地集成到任何基于Spring的应用程序中,它支持多种身份验证选项和授权策略,此外,还提供一些附加功能,如集成第三方身份验证提供商和单点登录,以及会话管理和密码编码等。
2. SpringBoot整合SpringSecurity 2.1. 引言 代码实现,基于前两章提到的登录、注册和鉴权项目,这里将使用SpringSecurity框架,逐步替代前两章自定义的认证授权实现。首先,注释掉WebMvcConfiguration类,去除该类对我们后续使用SpringSecurity的影响。
1
2
3
4
5
6
7
8
9
10
11
12
13
14
15
16
17
18
19
20
21
22
23
24
25
26
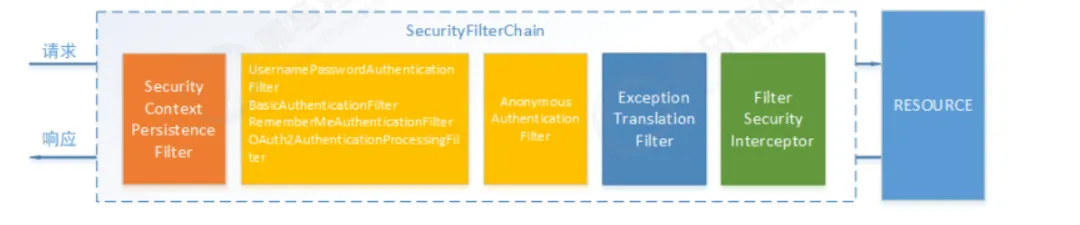
2.2. SpringSecurity完整流程 SpringSecurity功能的实现主要是一系列过滤器链相互配合完成的
SecurityContextPersistenceFilter:整个拦截过程的入口和出口(也就是第一个和最后一个拦截器),会在请求开始时从配置后的SecurityContextRepository中获取SecurityContext,然后把它设置给SecurityContextHolder,请求完成后将SecurityContextHolder持有的SecurityContext再保存到配置后的SecurityContextRepository,同时清除SecurityContextHolder所持有的SecurityContext;
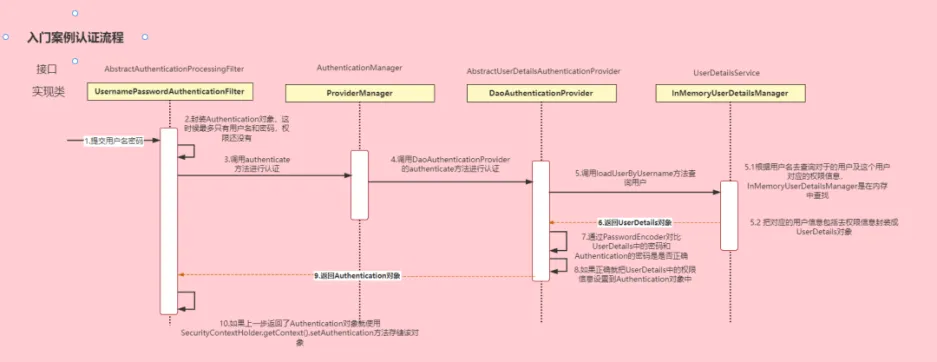
2.3. 认证流程 AuthenticationManager:定义认证Authentication的方法
1
2
3
4
<dependency>
然后定义一个测试接口,用于测试SpringSecurity:
1
2
3
4
5
6
7
8
9
10
11
12
13
14
15
16
package com.yang.controller;import com.yang.infrastructure.common.Response;import org.springframework.web.bind.annotation.GetMapping;import org.springframework.web.bind.annotation.RequestMapping;import org.springframework.web.bind.annotation.RestController;@RestController @RequestMapping(value = "/security") public class SecurityController {@GetMapping(value = "/hello") public Response hello () {return Response.success("hello" );
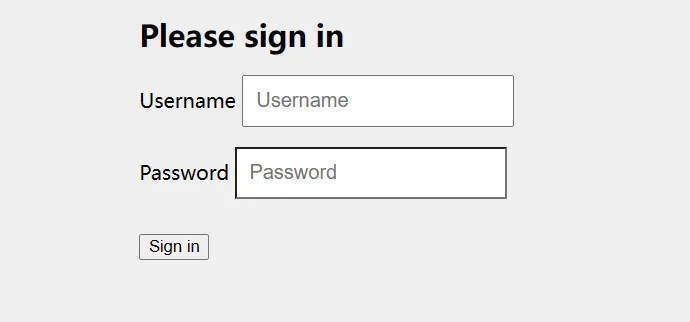
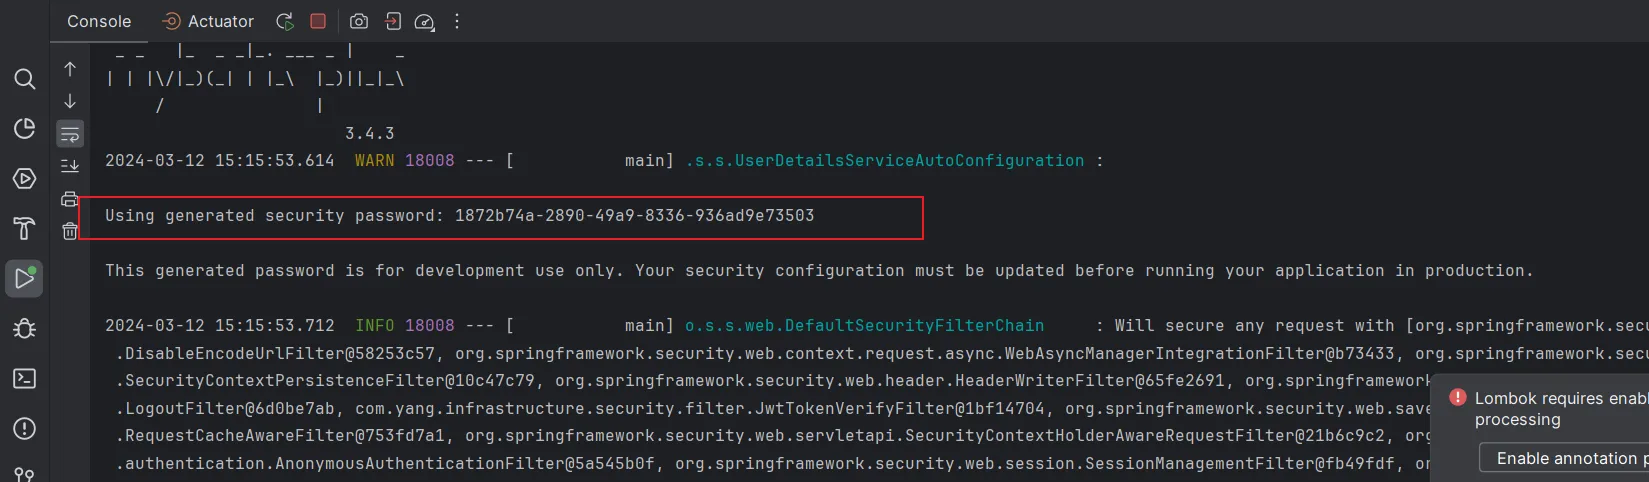
启动项目,访问/security/hello接口,此时会跳转到登录界面
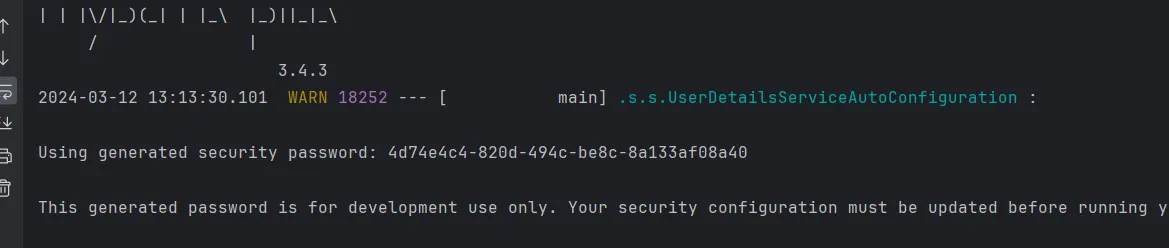
在控制台中,我们可以看到如下内容
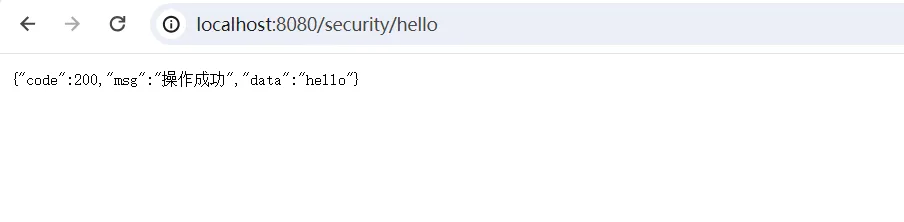
我们使用user用户名,以及控制台中的密码,在表单提交登录,此时便会跳转到登录成功页面。
2.4.2. UserDetailsService 在每次启动项目的时候,我们查看控制台时,总是能看到下面生成了一串UUID字符串
这是因为在默认情况下,SpringSecurity自动化地帮我们完成以下三件事情:
1
2
3
4
5
6
7
8
9
10
11
12
13
14
15
16
17
@Configuration public class SecurityConfig {@Bean public UserDetailsManager users () {UserDetails user = User.builder()"cxy" )"{bcrypt}$2a$10$CrPsv1X3hM" +".giwVZyNsrKuaRvpJZyGQycJg78xT7Dm68K4DWN/lxS" ) "USER" )InMemoryUserDetailsManager manager = new InMemoryUserDetailsManager ();return manager;
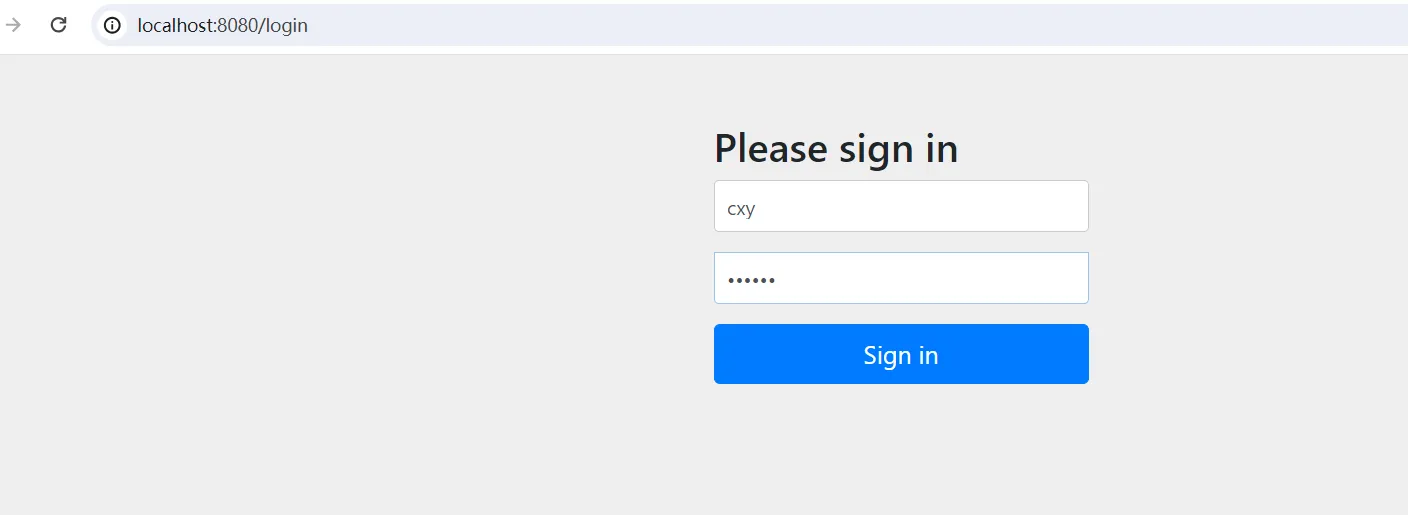
重新启动项目,访问测试接口/security/hello,用户名输入cxy,密码输入123456
JdbcUserDetailsManager的实现与InMemoryUserDetailsManager类似,这里就不赘述了。
2.4.3. 登录和注册放行 上面这种整合方式,会对所有的请求进行拦截,但是一般情况下,我们是不拦截用户登录和用户注册接口的,而且现在的项目一般是前后端分离,没必要跳转到专门的登录页面。
1
2
3
4
5
6
7
8
9
10
11
12
13
14
15
16
17
18
19
20
21
22
23
24
25
@Configuration @EnableWebSecurity @EnableGlobalMethodSecurity(prePostEnabled = true) public class OldSecurityConfig extends WebSecurityConfigurerAdapter {@Autowired private UmsAdminService adminService;@Override protected void configure (HttpSecurity httpSecurity) throws Exception {@Override protected void configure (AuthenticationManagerBuilder auth) throws Exception {@Bean @Override public AuthenticationManager authenticationManagerBean () throws Exception {return super .authenticationManagerBean();
但这种方式在SpringBoot 2.7.0中,WebSecurityConfigurerAdapter已经被弃用了,新用法中,无需继承WebSecurityConfigurerAdapter,只需要直接声明一个配置类,再配置一个生成SecurityFilterChainBean方法,配置信息如下,我们对/user/login和/user/register接口,进行放行,而其他接口,都需要进行验证。
1
2
3
4
5
6
7
8
9
10
11
12
13
14
15
16
17
18
19
20
21
22
23
24
25
package com.yang.infrastructure.auth.config;import org.springframework.context.annotation.Bean;import org.springframework.context.annotation.Configuration;import org.springframework.security.config.annotation.web.builders.HttpSecurity;import org.springframework.security.config.http.SessionCreationPolicy;import org.springframework.security.web.SecurityFilterChain;@Configuration public class SecurityConfig {@Bean filterChain (HttpSecurity httpSecurity) throws Exception {return httpSecurity.authorizeRequests()"/user/login" ).permitAll()"/user/register" ).permitAll()
http.authorizeHttpRequests(): 指定哪些请求需要什么样的认证或授权,这里使用anyRequest()和authenticated()表示所有请求均需要认证。
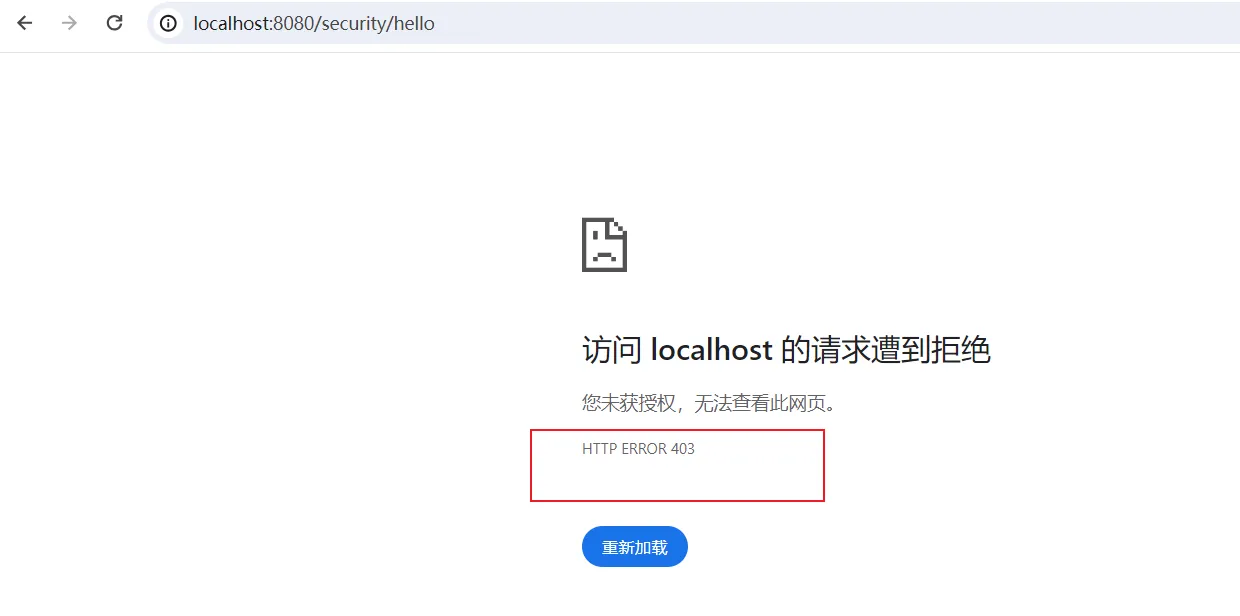
再访问/security/hello接口,结果是403,说明无权访问。
2.4.4. 异常处理 在最开始的时候,我们没有配置任何东西时,没有权限便会默认跳转到用户登录界面,现在因为我们没有配置登录表单路径,所以会直接提示403,我们可以在配置类中,配置异常处理方式,方便返回一些格式化的数据供前端做出决策。
1
2
3
4
5
6
7
8
9
10
11
12
13
14
15
16
public class JwtAuthenticationExceptionHandler implements AuthenticationEntryPoint {@Override public void commence (HttpServletRequest request, HttpServletResponse response, AuthenticationException authException) throws IOException, ServletException {private void sendErrorResponse (HttpServletResponse response) throws IOException {"UTF-8" );PrintWriter writer = response.getWriter();
然后我们修改SpringSecurity的配置类,添加上和异常处理相关的配置:
1
2
3
4
5
6
7
8
9
10
11
12
13
14
15
16
17
18
19
20
@Configuration public class SecurityConfig {@Bean filterChain (HttpSecurity httpSecurity) throws Exception {return httpSecurity.authorizeRequests()"/user/login" ).permitAll()"/user/register" ).permitAll()new JwtAuthenticationExceptionHandler ())
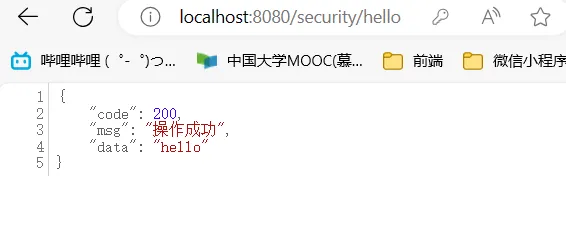
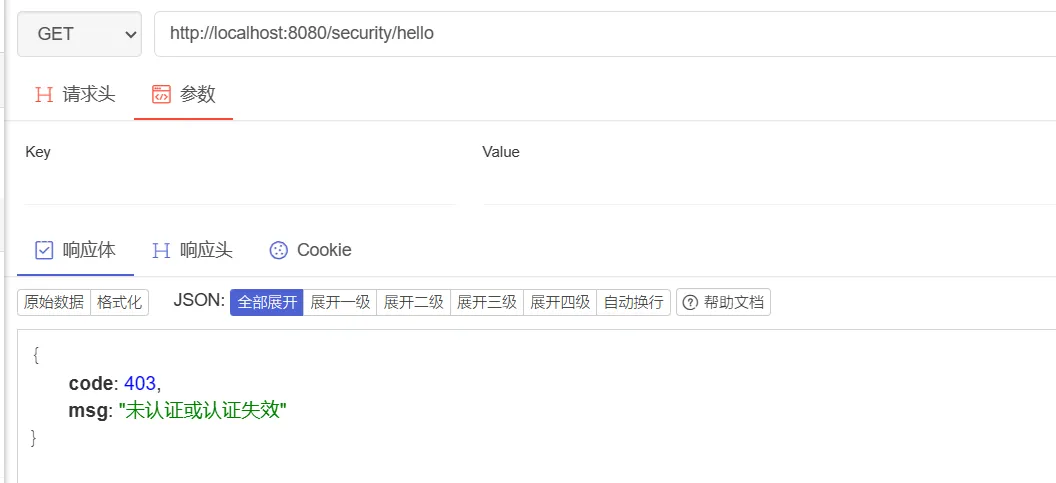
接着再次访问/security/hello接口,结果如下:
同理,在权限不足的情况下,我们也可以实现相关的异常处理类
1
2
3
4
5
6
7
8
9
10
11
12
13
14
15
public class JwtAccessDeniedExceptionHandler implements AccessDeniedHandler {@Override public void handle (HttpServletRequest request, HttpServletResponse response, AccessDeniedException accessDeniedException) throws IOException, ServletException {private void sendErrorResponse (HttpServletResponse response) throws IOException {"UTF-8" );PrintWriter writer = response.getWriter();
修改配置类:
1
2
3
4
5
6
7
8
9
10
11
12
13
14
15
16
17
18
19
20
21
@Configuration public class SecurityConfig {@Bean filterChain (HttpSecurity httpSecurity) throws Exception {return httpSecurity.authorizeRequests()"/user/login" ).permitAll()"/user/register" ).permitAll()new JwtAuthenticationExceptionHandler ()) new JwtAccessDeniedExceptionHandler ())
2.4.5. 认证过滤器 当我们登录成功后,一般会返回一个token,然后前端后续将这个token,携带于请求头,想后端发起访问,后端解析这个token,来判断该请求是否认证通过,通过,则放行。在SpringSecurity中,我们可以通过addFilterBefore()将我们自定义过滤器添加上去,然后再我们的自定义过滤器中,实现相关的token解析逻辑。
1
2
3
4
5
6
7
8
9
10
11
12
13
14
15
16
17
18
19
20
21
22
23
24
25
26
27
28
29
30
31
32
33
34
35
36
37
38
39
40
41
42
43
44
45
46
47
48
49
50
51
52
53
54
55
56
57
58
59
package com.yang.infrastructure.security;import com.yang.infrastructure.auth.UserContextDetails;import lombok.Data;import org.springframework.security.core.GrantedAuthority;import org.springframework.security.core.userdetails.UserDetails;import java.util.Collection;@Data public class MyUserDetails implements UserDetails {private UserContextDetails userContextDetails;private String password;public MyUserDetails (UserContextDetails userContextDetails) {this .userContextDetails = userContextDetails;public MyUserDetails (UserContextDetails userContextDetails, String password) {this .userContextDetails = userContextDetails;this .password = password;@Override public Collection<? extends GrantedAuthority > getAuthorities() {return null ;@Override public String getPassword () {return this .password;@Override public String getUsername () {return userContextDetails.getUsername();@Override public boolean isAccountNonExpired () {return true ;@Override public boolean isAccountNonLocked () {return true ;@Override public boolean isCredentialsNonExpired () {return true ;@Override public boolean isEnabled () {return true ;
我们我们添加一个JwtTokenVerifyFilter,这个类继承于OncePerRequestFilter,其具体实现如下:
1
2
3
4
5
6
7
8
9
10
11
12
13
14
15
16
17
18
19
20
21
22
23
24
25
26
27
28
29
30
31
32
33
34
35
36
37
38
39
40
41
42
43
44
45
46
47
48
49
50
51
52
53
54
55
56
57
58
59
60
61
62
63
64
65
66
67
68
69
70
71
72
73
74
75
76
77
78
79
80
81
82
83
84
package com.yang.infrastructure.security.filter;import com.alibaba.fastjson.JSONObject;import com.yang.domain.data.Role;import com.yang.infrastructure.auth.PermissionDetails;import com.yang.infrastructure.auth.UserContextDetails;import com.yang.infrastructure.auth.config.JwtTokenProperty;import com.yang.infrastructure.auth.request.JwtTokenVerifyRequest;import com.yang.infrastructure.auth.response.JwtTokenVerifyDTO;import com.yang.infrastructure.auth.service.JwtTokenService;import com.yang.infrastructure.security.MyUserDetails;import com.yang.infrastructure.utils.RedisUtils;import com.yang.infrastructure.utils.SpringContextUtils;import org.apache.commons.lang3.StringUtils;import org.springframework.security.authentication.UsernamePasswordAuthenticationToken;import org.springframework.security.core.context.SecurityContextHolder;import org.springframework.security.core.userdetails.UserDetails;import org.springframework.web.filter.OncePerRequestFilter;import javax.servlet.FilterChain;import javax.servlet.ServletException;import javax.servlet.http.HttpServletRequest;import javax.servlet.http.HttpServletResponse;import java.io.IOException;import java.util.List;import java.util.stream.Collectors;public class JwtTokenVerifyFilter extends OncePerRequestFilter {@Override protected void doFilterInternal (HttpServletRequest request, HttpServletResponse response, FilterChain filterChain) throws ServletException, IOException {String token = request.getHeader("token" );if (StringUtils.isEmpty(token)) {return ;UserContextDetails userContextDetails = null ;Object userDetailsFromRedis = getUserDetailsFromRedis(token);if (userDetailsFromRedis != null ) {if (userContextDetails == null ) {JwtTokenService jwtTokenService = SpringContextUtils.getBeanOfType(JwtTokenService.class);JwtTokenProperty jwtTokenProperty = SpringContextUtils.getBeanOfType(JwtTokenProperty.class);JwtTokenVerifyRequest jwtTokenVerifyRequest = new JwtTokenVerifyRequest ();JwtTokenVerifyDTO verify = jwtTokenService.verify(jwtTokenVerifyRequest);if (verify == null ) {return ;new UserContextDetails ();"username" ));"roles" ), Role.class);PermissionDetails permissionDetails = new PermissionDetails ();return permissionDetails;if (userContextDetails == null ) {return ;UserDetails userDetails = new MyUserDetails (userContextDetails);UsernamePasswordAuthenticationToken authenticationToken = new UsernamePasswordAuthenticationToken (userDetails, null , null );private Object getUserDetailsFromRedis (String token) {RedisUtils redisUtils = SpringContextUtils.getBeanOfType(RedisUtils.class);return redisUtils.getKey("token:" + token);
其实从上面的实现中,会发现,与我们之前的JwtTokenVerifyInterceptor很像,不过我们当时只是简单地通过线程上下文来传递用户核心信息,而SpringSecurity对此进一步作出封装:
1
2
3
4
5
6
7
8
9
10
11
12
13
14
15
16
17
18
19
20
21
22
@Configuration public class SecurityConfig {@Bean filterChain (HttpSecurity httpSecurity) throws Exception {return httpSecurity.authorizeRequests()"/user/login" ).permitAll()"/user/register" ).permitAll()new JwtAuthenticationExceptionHandler ()) new JwtAccessDeniedExceptionHandler ()) new JwtTokenVerifyFilter (), UsernamePasswordAuthenticationFilter.class)
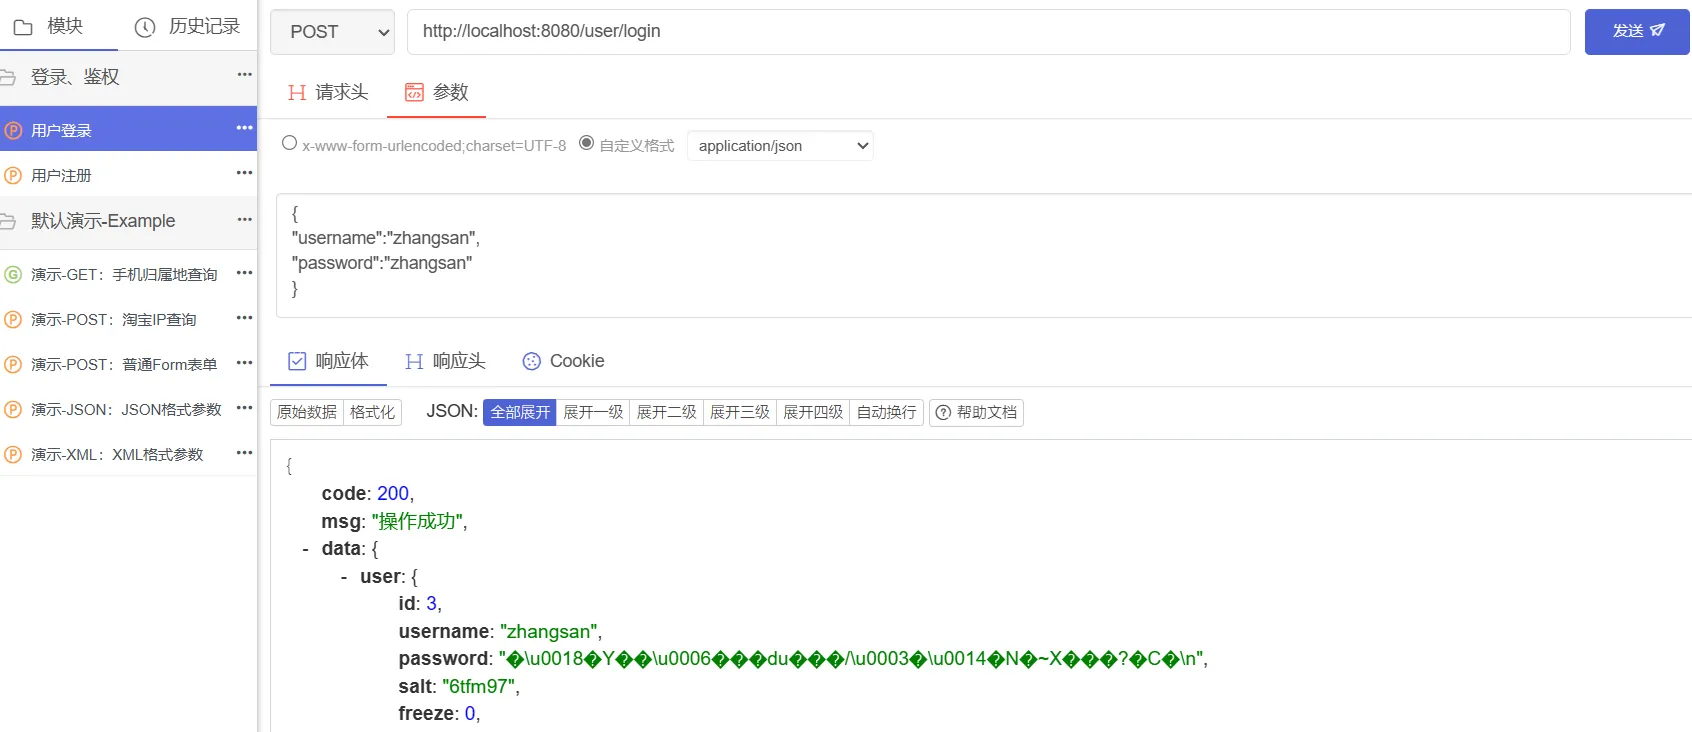
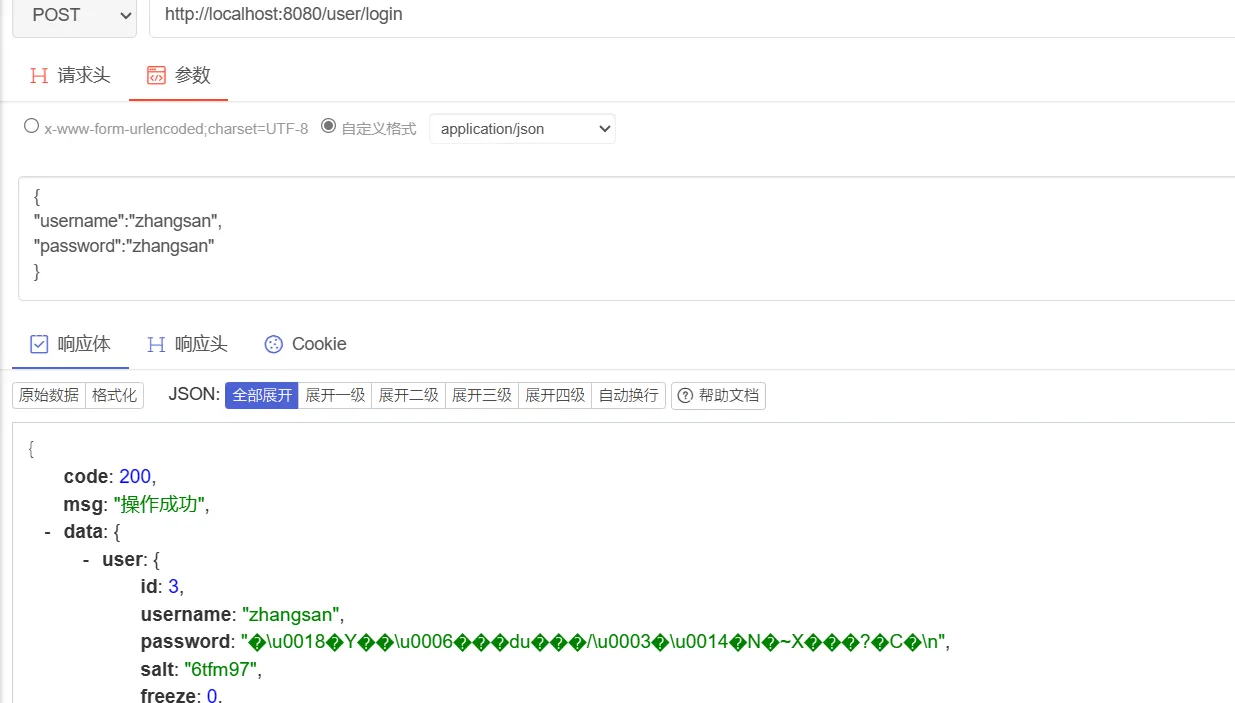
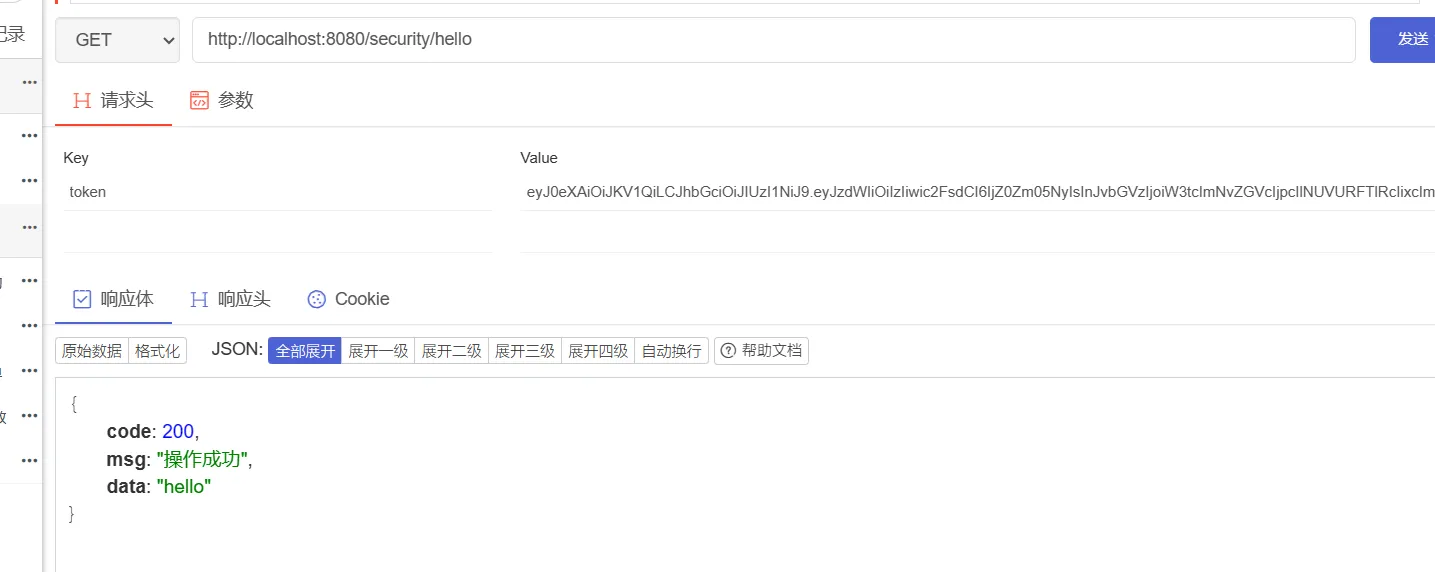
然后我们启动项目,先进行登录
登录成功后,携带该token,作为请求头,访问/security/hello测试接口,访问成功
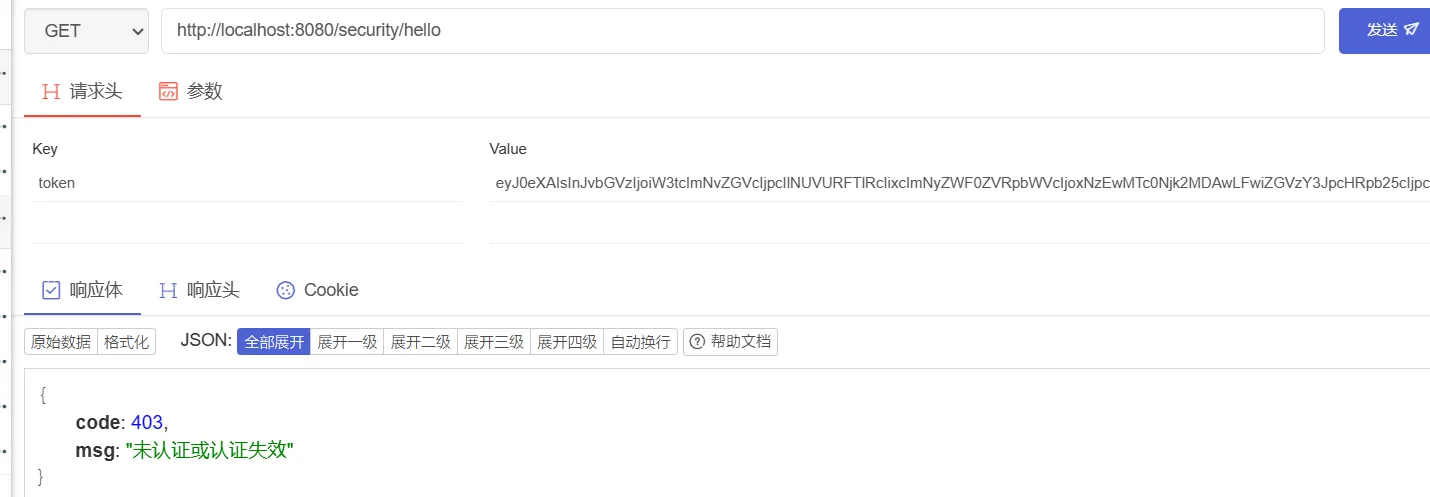
然后我们携带一个无效的token,作为请求头,再次访问/security/hello测试接口
3. 参考文章 https://segmentfault.com/a/1190000041947192 https://blog.csdn.net/m0_37989980/article/details/107519382 https://zhuanlan.zhihu.com/p/455858001